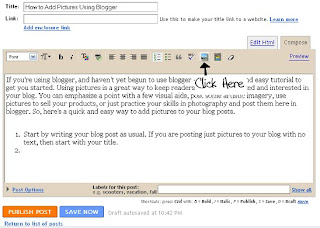
Start by writing your blog post as usual. If you are posting just pictures to your blog with no text, then start with your title.Click the "Add Image" button on the Blogger toolbar, which is located above the posting area, but below the title area. Clicking this will open a pop-up window, so if your browser prevents it, change the settings to allow pop-ups for Blogger.

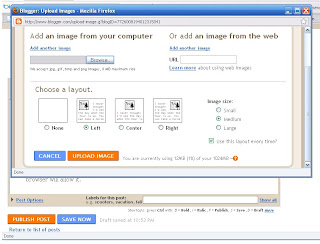
From the pop-up window (shown below) . To search for and upload an image from your computer, select the "Browse" button at the top-left side of the window.

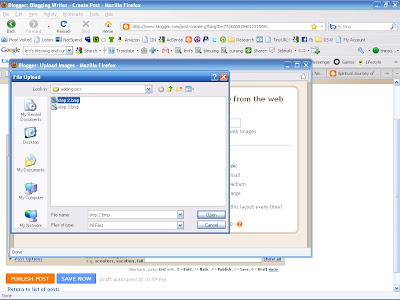
By clicking "Browse", a file search window will open, where you will select the image you wish to use for your blog entry, (shown below). Once you have selected the image, click "Open" and return to the Blogger pop-up.

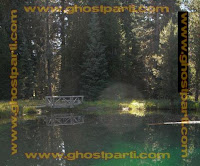
From the Blogger pop-up, select the size and layout of the image you are uploading. For this tutorial, I have selected the "Center" layout with "Large" images. Click "Upload" and your image will be uploaded to the "Edit Post" screen, although you may need to close the pop-up after the image has finished uploading by simply clicking the red "X" in the top-right corner of the pop-up. From within the "Compose" mode of the "Edit Post" screen, you will see that your photo will automatically default to the top of your post, but you can drag and drop the picture another area within the post if desired.
Here are some more examples of layout positions, using "Small" sized images:
 This image was placed using the "None" layout option. Notice how the bottom of the first line of text is lined up with the bottom of the image, and continues from there in the form of a paragraph. If you have selected this position on accident, you can either select the image by clicking on it, then delete it, or use the "Edit Html" to change the position within the HTML code, (caution: recommended only for somewhat experienced HTML users).
 This image was placed using the "Left" layout option. Notice that the image is located at the left, within the body of the paragraph. This option creates a nice clean layout. Your text will wrap around the bottom of the text as you continue to type your blog post.
 The next picture is located to the right of the text, using the "Right" layout option. The picture is neatly situation within the body of the paragraph, as it is with the "Left" layout option. Additional text within the paragraph that extends beyond the borders of the picture or image will wrap around it, creating a clean and neat layout for your blog post. As you can see by the positioning of the "Left" and "Right" examples, you can easily use the two layout options to align pictures to both the left and right. You can also use the alignment buttons at the top of the editing area in "Compose" mode to align your text to fit your needs.
So now you can actively create eye-catching blog posts that captivate your readers, both visually - as well as with the well-written blog content they originally came to read! Have fun with your posts, but remember not to violate any copyrights by using pictures that you didn't take, or images you didn't create. Always obtain permission, or obtain some of the many royalty-free stock photos and images available on the web.

No comments:
Post a Comment